....because everybody's gotta live somewhere.
So by now hopefully you've downloaded my rules (huge hint!!!) and are eagerly awaiting your first game. Well, you're gonna have to put some sort of passable terrain on the board, aint'cha? After all, the visual appeal of the game is what's gonna get other players hooked, and give you folks to play with.
One of my favorite terrain pieces is the pre-fab metal building. Whole villages can be cheaply assembled, and when you paint your buildings right, you can set up a wasteland village that'll knock the players' socks off. Like with most things on this site, you can save money if you're smart.
For the pre-fab tin shack basic shells, you're looking for plastic packaging materials. Things that once housed cakes, cookies, cell phones, even stuffed pork chops will do. What you're looking for is material that is is fairly sturdy and has good angles and ribbing to simulate the endless shacks, shanties, and quonset huts of the post-collapse world.
Below are some of the things you'll need:
As you can see from the above, the brush is not the best. It's not supposed to be. This 3/4 inch wide flat brush once dry-brushed like a charm, but is now separated, clogged, and has many stray bristles. Perfect for the techniques on this page. The second item is some rust-colored acrylic paint. This particular one is a favorite of mine. It is a model railroad rust paint that is not at all creamy. It is very watery and runny, yet covers well. It is almost, but not quite, a wash. The last picture shows pastel chalks gotten from a model railroad store. Their use will be shown later. So let's get to it...!


This package once held the aforementioned stuffed porkchops. You get two, so the package had two of the above shells. This one was chosen as a pre-fab as it has plenty of good ribbing and edges that will look good once rusted out.
You can start the silver base coat off one of several ways. You can spray paint it silver, and then give it a coat of matte lacquer to tone it down, or you can just paint the silver on with acrylic paint. After this you can use spray paint to lightly over-spray it with red-brown auto primer or even black to give it a spattered effect. Just a light dusting will do. Or in this example, you can leave it reasonably clean.

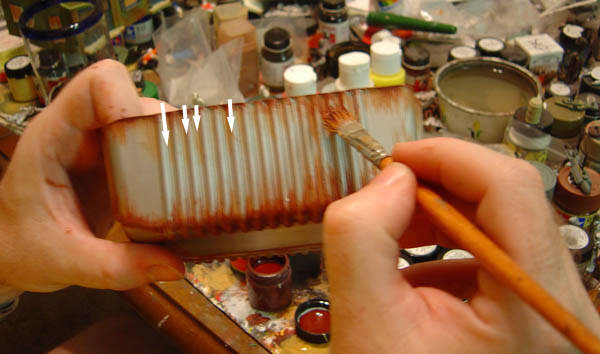
Dip the tip of that almost-used-up old brush into the rust paint. Don't load up your brush with too much paint. Just put the tip into the paint. Find the top edges of your model and bush it on with irregular, downward strokes. Pretend you have a pencil in your hand, and you're trying to get downward lines that trail off at the end. Here is where the seperated bristles of the old brush go to work for you creating running rust streaks. Go ahead an make them as long or short as you want. Put as many or as few as you want onto the model. My preference is for more rather than less.
Then go ahead from around the bottom edge and do the same thing, with the strokes going upward. Remember, this is to simulate running rust, which is the result of rain coming down and water seeping up. Ready for the next step? Here it is...

The second step is pretty much the same as the first. Just this time, do it with a darker red-brown rusty color. You'll also want to make the streaks somewhat smaller. You don't want to cover up what you've already done - you want variations in rust color as metal corrodes unevenly. Do the top and bottom edge. If you'd like to repeat the step with other rusty colors at this point, feel free.
For the next painting step, you will be using a dark metal color. You'll want something that's an oily black. Most of the 'gunmetal' colors put out by most paint companies are too light. Get a bottle of silver and put a whole lot of black paint in it if you can't find a custom color. Put the paint on your brush as before. This time though, go across the ribs with the flat part of the brush. Again, don't load up your brush with too much paint. Pretend that you're trying to scrape off the paint on the ribs with an X-Acto knife with this action. Do this scraping action on all angular edges. (See A, above). To really darken up the ribs, go ahead and drag the tip of your brush across the ribs. The more you do this, the darker the ribs will be. This is pretty much your standard dry-brushing technique. (B, above). The point of doing this step is that metal scrapes as it touches or is touched by other hard items. These scrapes occur on the angular edges of the item and darken and rust quicker than the flat surfaces.


If your model has a top 'rim' edge, you'll want to make sure that that's clearly defined by a dark metal scraping stroke or two (Illust. at left). The actual corners of buildings should get some attention too, as that's where you usually find some wear. Since this model has very gradually rounded corners, we'll have to employ another technique to get the dark metal scraping effect. As before, put the dark metal paint on your brush. Wipe off most of it, so that if you were to brush it across your finger, you would just raise a fingerprint but no more. Now, go ahead and use a back-and-forth scrubbing motion on a reasonably wide swath of the edge (Illust. on right).
Now it's time to bring out the pastel chalks! They are more subtle than paint, and less expensive than getting an airbrush. Put a generous amount of rust colored chalk onto your brush and put this into your inward-folding edges (cracks and recesses) with a grinding and sweeping motion. Blow off the excess. At miniumum, you should have a black chalk, rust chalk, and a light colored dust/dirt chalk, but you can have as many as you like. You could cover the entire model with the chalk if you want to. If you put too much on, you can wipe some off with a dry cloth. The effect will be very subtle. It will also obscure all your previous paintwork somewhat, so be careful.

Do the same with the black chalk in the more prominent recesses. I also recommend you give the base edge (where the building meets the ground) a dusting of black chalk also, and not just for pre-fabs but for all ruined buildings. This is because as water seeps up from the ground, the item it contacts with will get moldy. It's a great way to make your buildings stand out from the terrain base. It'll make your game setup 'pop'.

Give your model a good coat of matte varnish and you're done! Above is the building used in our example. When you start out doing this, you'll probably have longer, darker streaks because you're loading up your brush with lots of paint. Don't despair, just wipe some off and go again. If you want to add some overhangs over the doors, use old lightbulb boxes. Want chimneys? The 'bendy' part of bendy drinking straws will do nicely, but give them a coat of black acrylic paint before you prime the model. Be sure to glue any extra bits onto the model before you paint. For inspiration and study models, check out my links page. It has a link to an 'Abandoned Places' site that will show you all sorts of real-world examples of rusted, decayed buildings. Play around with washes, chalks, inks, streaks etc to get the rotted, mouldering effects of the works of man being reclaimed by nature.


As a final note, I'd like to touch on a theme that runs through this website again and again: You CAN do good looking wargames on the cheap if you know where you can cut corners. Above, you'll see the 'before and after' shot of a pre-fab shanty that was made out of the packaging of a vending-machine sandwich at my workplace. I now have practically a whole village of these. I was going to eat the things anyway, and I had two other sandwich-lovers giving me their packages too! Just an afternoon's work later, and I had a really good looking post-nuke junker village for practically nothing.


Yumm... Pork Chops! Hey, wait a minute..... those kinda remind me of something......!